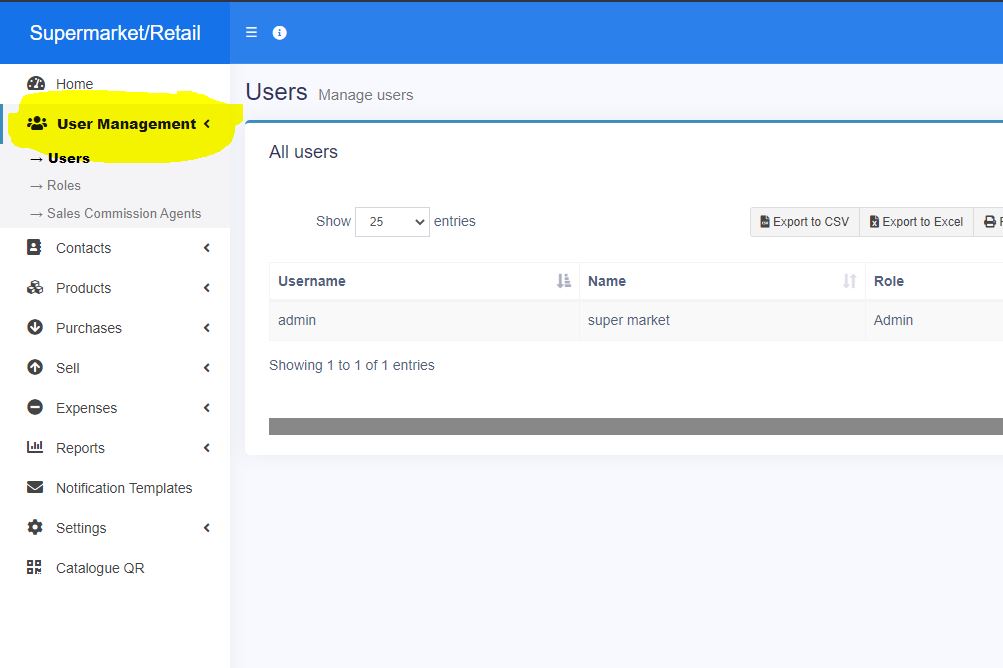
Adding users
- User Management -> Users -> Add New
- Fill the user details, select user role, give a unique username.
- Sales Commission Percentage (%): Provide the commission % for this user. This option gets applied if the commission agent feature is enabled.
- : Activate/Deactivate the user.
- You can edit/delete a user.
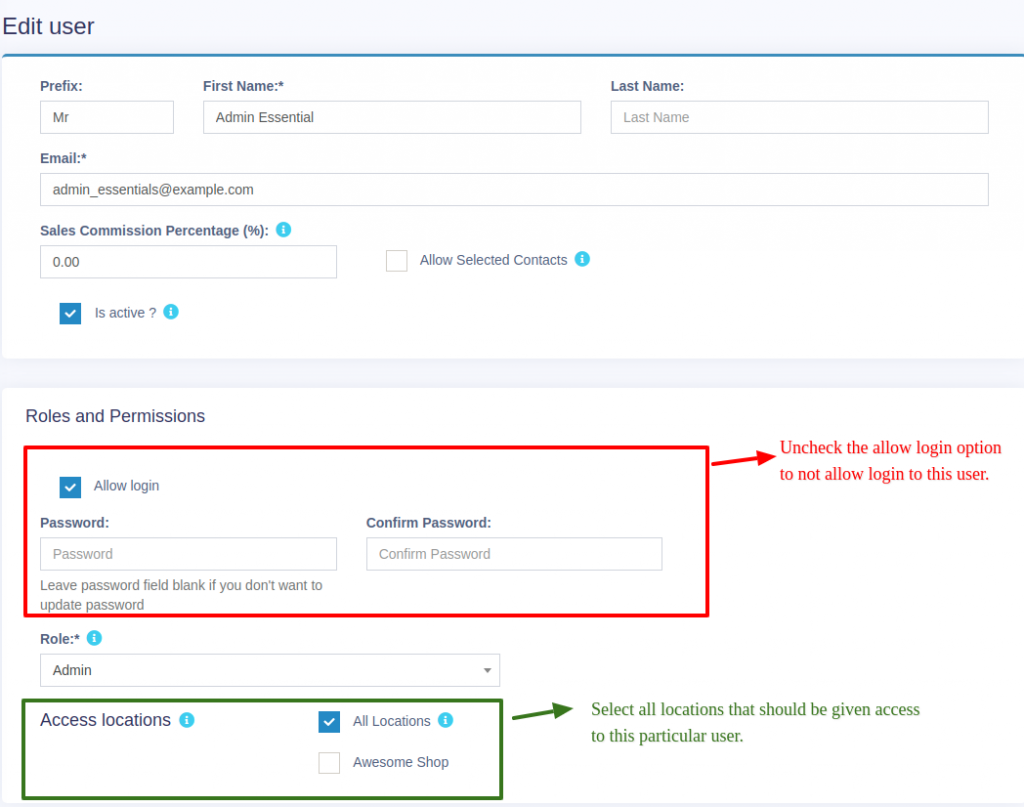
Assing locations
Refer to the image below
Max sales discount:
The maximum discount this user can give during sales in the POS & sales screen. If you don’t want to have this restriction then simply keep this value blank.
Disable login
Refer to the image below
Adding Roles
- Every new business comes with some default roles – Admin & Cashier.
Admin have all permissions in the application.
Cashier have permission to only POS section. - You can create a role by clicking on Add button -> Giving a role name and then selecting the appropriate permission for that role.
- Sometime you may need to give a user access to a/some particular location(s) only. In this case, select the locations from “Access locations” permission. Select “All Locations” to give permission to access all locations for your business.
- Roles permissions can be edited & Deleted.
Commission Agent is useful for many businesses. Businesses pay sales agent/commission agent commission on every sale they bring.
Enabling & Choosing Commission Agent Type:
By default Commission Agent is Disabled. You can enable it from Settings -> Business Settings -> Sales. Sales Commission Agent drop-down.
You will see 3 different types:
- Logged in User: If this option is used then the Logged in User will be automatically considered as the commission agent for the sales added by him. Meaning the user adding the sales will get the commission for the sales.
- Select from User’s List: If this option is enabled then in POS & Sales Screen you will see the list of “users” present in your business. The user adding the sales will select the commission agent from the list of users displayed.
- Select from Commission Agent List: If this option is enabled then in POS & Sales Screen you will see the list of “Sales Commission Agents” present in your business. The user adding the sales will select the commission agent from the list of “Sales Commission Agents” displayed.
Select the option as per your business requirements.
Adding Commission Percentage:
You can add commission % while adding/editing the User or Sales Commission Agent
Calculating Commission Amount:
To See the commission amount, Go to Reports -> Sales Representative Report.
Select the User for which you want to see the commission amount.
On selecting it will show you the detailed summary of Total Sale, Total Sale Commission & Total Expense. Also, the table below lists all the transactions.
NOTE: Sales commission is calculated without shipping or tax. Sales commissions are from the sales of the items, not the overhead cost such as taxes, freight, shipping, handling, etc.
Commission payment:
After getting the commission amount, UltimatePOS have 2 ways to make payment for the commission.
Using expense
- Calculate the commission from the sales representative report and after paying the amount add it as an expense in Add Expense menu.
- In Add expense, select the Expense-For dropdown
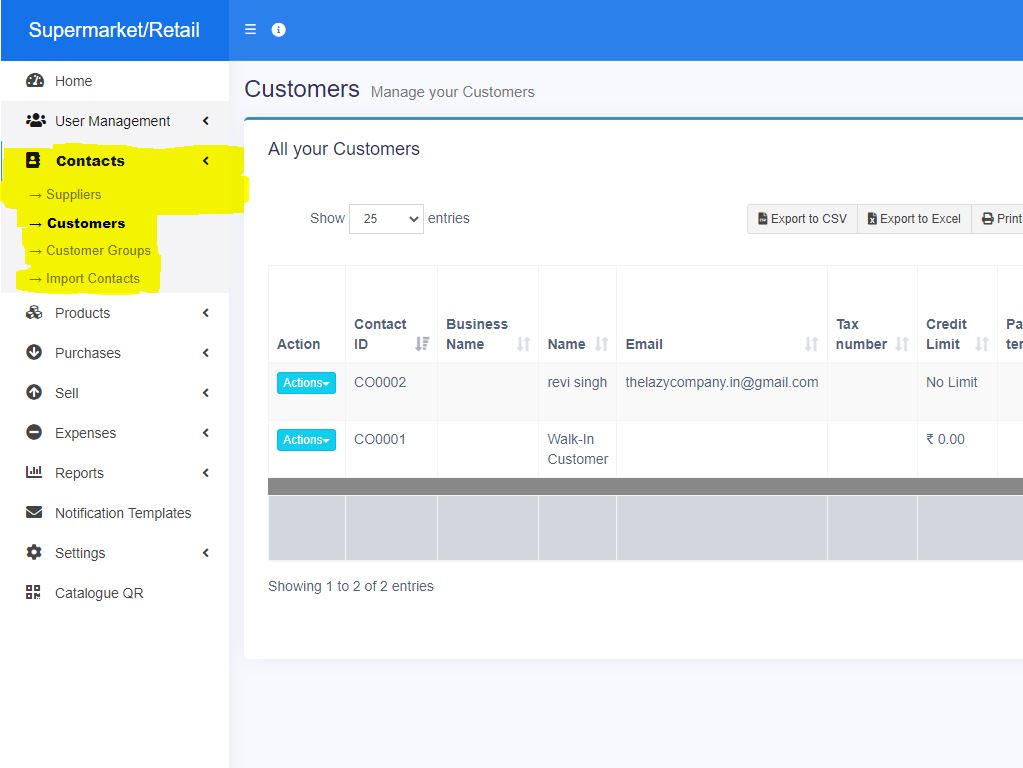
Adding Suppliers & Customers
- Goto Contacts -> Suppliers or Customer
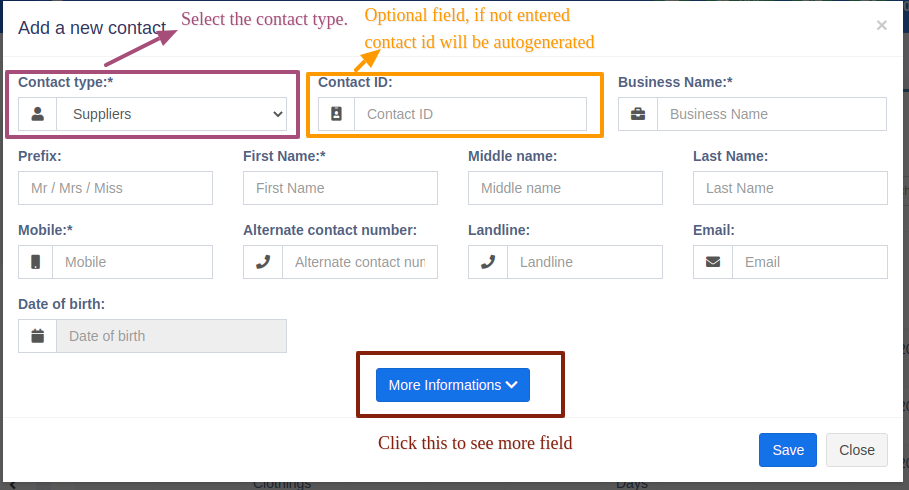
- Click on add new contact. Select contact type – Supplier/Customer/Both
- Based on the contact type selected – it will show the relevant fields. Fill the relevant details.
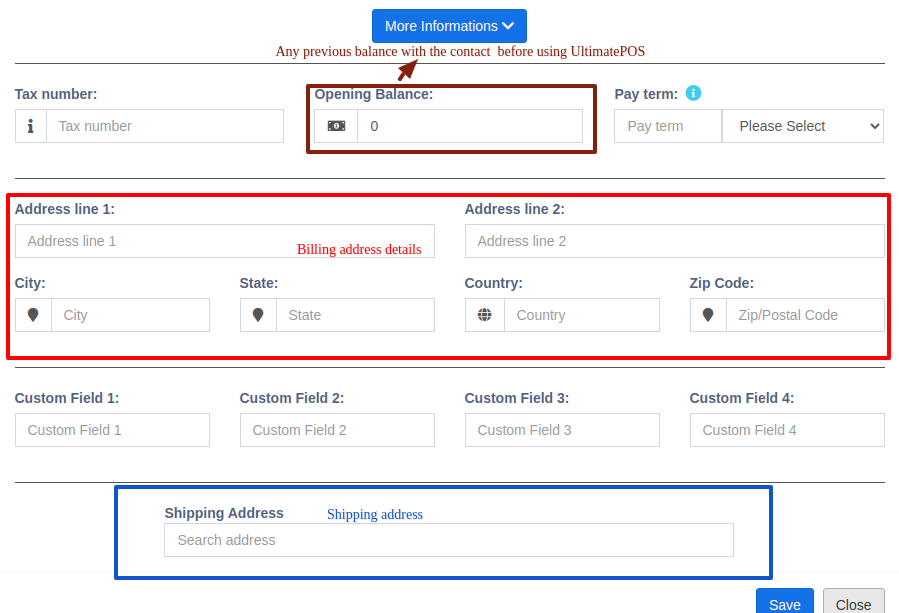
- Click on More More Information button to see more field.
- Pay Terms: This will help the system to notify you of any pending payments for suppliers & customers. You can specify pay term in either days or months.
- Customer Group: Read details here.
- Credit Limit: This is the maximum amount of credit that can be given to the customer. If in any sales the credit exceeds this amount then it won’t allow selling on credit.
- Opening Balance: Opening balance of a customer or supplier before you start using OurPOS. So if there is any previous balance you can add here.
- Advance balance: Sometimes customer/supplier pay/takes money in advance. This wil show the amount of advance balance paid or take by the customer/supplier respectively.
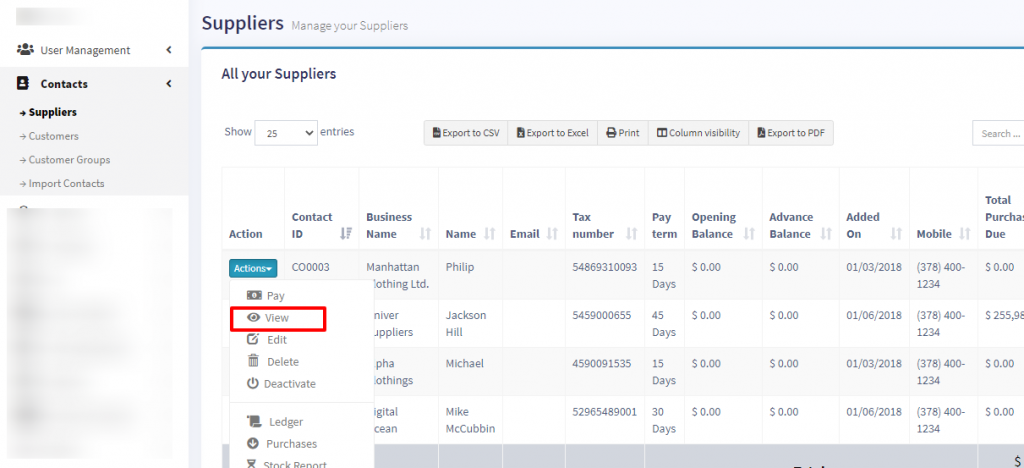
Viewing Suppliers & Customers
- To view details about a Supplier or Customer click on View button. It will show the complete details along with the relevant transactions (Purchases & Sales) for that contact.
- Pay Due amount: You can use this button to pay the due amount for a customer or supplier. This will pay the overall due amount for all invoices.
Opening balance:
Opening balance is the balance contact (customer or supplier) have at the beginning of using the software.
Suppose you’re shifting the data from another software to OurPOS then the opening balance of the contact will be the balance amount which the contact has to pay/receive to/from you.
Opening balance for customer = Amount the customer has to pay
Opening balance for supplier = Amount you have to pay to the supplier.
Adding Opening balance
You can add an opening balance when adding/editing the supplier or customer. In the add contact screen, you will find the opening balance field.
View Opening balance payment
To view the opening balance of contact, go to List Supplier/customer, go to view, and on the view page, you will find the opening balance & opening balance due.
Pay or receive payment of opening Balance
Adding payment of the opening balance is the same as any other payments. Go to list Customer/Supplier -> Actions -> Pay.
It will open a popup modal where you can enter the payment amount.
With customer Groups, you can classify a customer as Retail Customers, WholeSale Customer, Friends, Colleagues and whatever you will love to…
1. To add a “Customer Group” go to Contacts -> Customer Groups & Click on “Add” button.
2. It will show a popup asking for customer group name & Calculation Percentage.
Calculation percentage is used to calculate selling price.
Example:
– Suppose if the Selling Price set for a product Product1 is $200
– Customer Group Name = Friend
Calculation Percentage = -20
– Note: -20 (notice a minus sign) or you may set it 20 = +20%
– And you have created a customer with Harry with Customer Group assigned as Friend.
– Now go to pos or Sell screen. Select the customer Harry and add the product1.
– You will notice that the selling price set for the product1 will be 200-20% = $160
This is how customer Group works.
Customer Group does an internal calculation and applied the calculation percentage to the selling price. It will not show a separate discount on the invoice or the pos screen.
This feature is highly useful when you have retail, wholesale or different customer categories.
You can view report for different customer group from “Customer Groups Report” or in other terms if you have retail and wholesale customer group you can see which type of customer group is giving more sale.
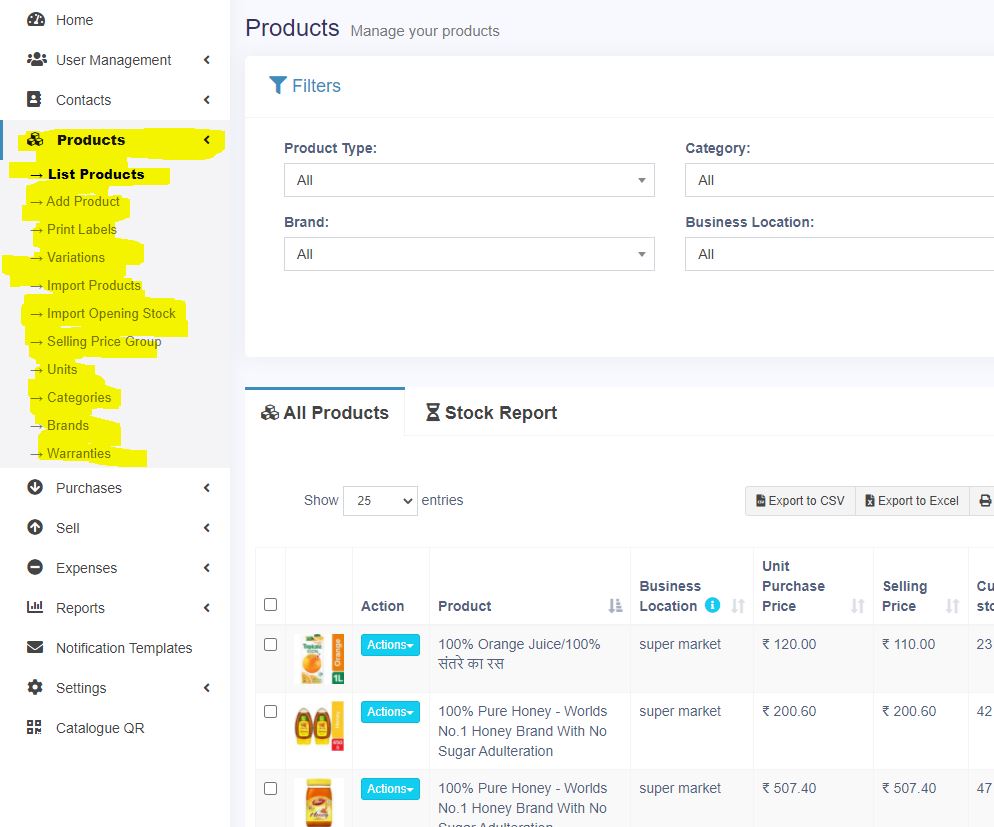
- Go to – Products > Add Products.
- Provide a Product Name,
Brand,
Units,
Category
Sub-category
SKU: Add a unique SKU which will be used to identify the product & Print barcode in labels. Leave it empty to auto-generate it. You can also add a Prefix for auto-generated SKU.
Barcode Type: Select a barcode type, default/recommended is C128 option. We recommend changing if only if the product added already have an SKU number for it.
Not For Selling: If a product is maked not-for-selling then it will not be displayed in POS or sales screen. This can be useful when using manufacturing module to make the ingredients as product not-for-selling also if you want to temporary disable selling for some products.
Alert Quantity: Alert quantity is used to alert when remaining stocks reaches to this level or below it.
Manage stock: Enable/Disable stock management at a product level. Product stock management is not required for services like Repairing, Hair Cutting, Web Development Printing. For items with Manage Stock Unchecked (disabled), you can sell them in unlimited quantities. Selling of service using POS - Business Location: Select the business location(s) where this product can sold or purchased.
- Select Applicable tax for that product. Adding Tax
- Product Type:
Single Product:
- Applicable for products with no variation with them then select single
- When selecting Single product – You will need to enter the Default product price including/excluding tax, Profit Margin % (you can set default profit margin from settings -> Business Settings; this will help to type % every time). Based on the profit margin it will auto calculate selling price excluding of Tax. You can also enter the selling price manually and it will auto adjust the profit margin for you.
Variable Product:
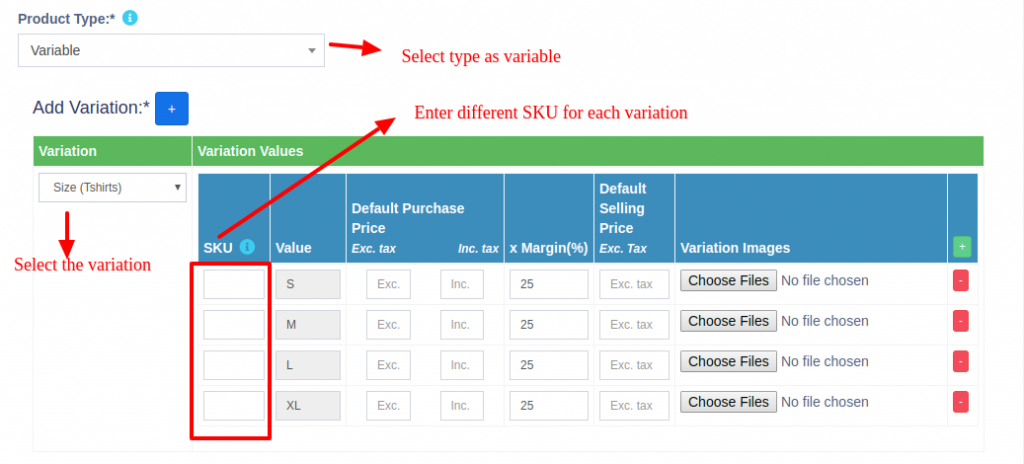
- Applicable to a product having variations (like size or color or design or flavors etc) You can define variation templates from Products -> Variations. The advantage of creating variation is that it saves time to add same variations multiple time.
- When selecting Variable product – It will display different fields to add all variations and its related Purchase price, Selling Price. You have to select the variations from the dropdown and it will auto-populate the variations for that template. You can change the variable name, Variation values.
- To give same purchase price or selling price or profit for all variations of a product click on the double tick present in the first variation.

- Read more about adding variations
Combo or Bundle Product

Adding a bundle product
- Combo product are also called bundle products.
- It is offering several products as one combined product.
For example a product “Computer Set” can have: 1 PC Monitor + 1 PC CPU + 1 Pc Keyboard + 1 PC mouse
So when someone buys Computer set she gets all the products in it. - Stock of bundled product depends on stock of individual products present in that bundle.
Example: if you have 5 PC Monitor, 4 PC CPU , 10 pc Keyboard, 50 PC mouse, the stock of Computer set will be 4 PC. - When the bundle product is sold, stock of all products inside them is automatically deducted.
- Individual products present in bundle product can also be sold separately.
- Bundle products cannot be purchased, only individual products present in it can be purchased.
Click on Save.
You can edit a product. You can also Copy / Export to CSV, PDF or Excel file.
Adding Products with multiple variations:
If you have products which involve multiple variations like for example a Shirt can have Color & Size variation, then we have multiple ways to work with it:
Solution 1, Create combined variation: Can a variation with a name “Color-Size” and add values like Red-Small, Red-Medium, Red-Large, etc, this can be used for while adding the Shirt.
Solution 2, Create multiple Products: Create multiple different products like Shirt-Red, Shirt-Green, Shirt-Blue with size as variations. When you create multiple products you will NOT have to enter the same details multiple times, first, add the Shirt-Red with all size variations of it and then use the Duplicate Product action to copy the data.
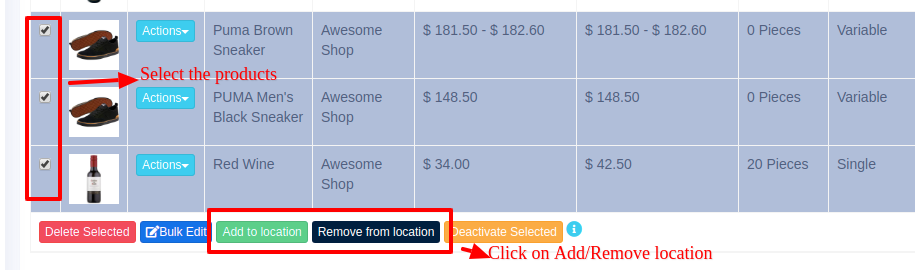
Assigning/remove locations of multiple products at once:
Go to List Products and refer to this screenshot.
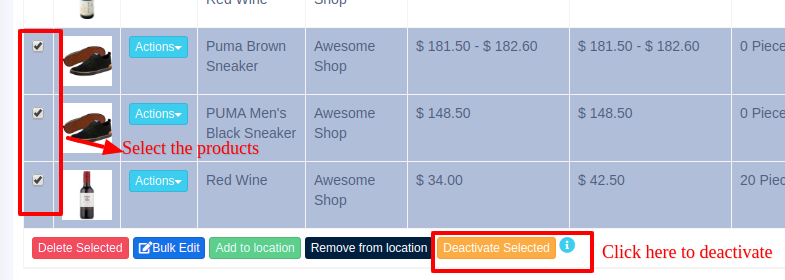
Deactivating & Activating Product:
Refer to the screenshot.
Using Product barcode:
Question:
How can we use the product’s barcode instead of creating and printing new for every product?
How can we use the brand’s barcode of the product instead of creating and printing new for every product?
Answer:
When creating a product, in the SKU field enter the barcode number of the product. This barcode will be used to identify the product in all screens like POS, Sales, purchases, reports, and others.
How to add a product that already has a Barcode?
Adding products that already have a barcode, follow the same steps as adding any other products.
- Go to add products
- Fill in all the product details
- IMPORTANT: in the SKU field scan or enter the barcode of the product.
Adding product quantity or adding product stock
For systematically managing your business, product quantities can be added in 3 ways:
- Adding Opening stock
- Adding purchases
- Manufacturing product: Useful for manufacturers, required manufacturing module.
Steps:
- Go to Products -> Import Products
- Download the template file.
- Fill all the information as per the displayed columns name & instructions. Don’t remove the heading from template file.
- Import the file
Common Errors:
- Error: UNIT not found
Solution: Make sure the unit you provided in excel file is already present in the system. Go to Products -> Units, add the unit & import the file again.
Not well-defined error:
Many times it can show some not well-defined errors like “non-numeric value encounter” or others
In this case, the best way is to split your import into multiple files.
For example, if you’re importing fil with 500 products, divide it into 2 files of 250 each and import it.
Deleting of a product will remove the products from the database.
NOTE: This delete will not work if the product have some transactions related to it. Transaction can be Opening Stock, Purchase, Sales or Stock transfer of the product. It will show some error like:
- Product can’t be deleted because purchases related to this product exist
- Some products couldn’t be deleted because it has transaction related to it.
Deleting individual product
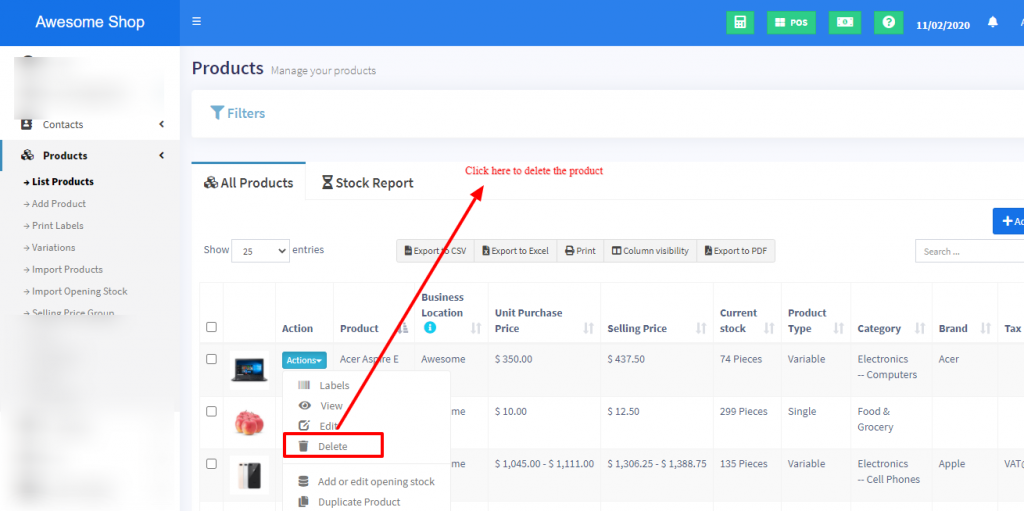
Bulk Delete multiple products

Delete product Errors:
When a product has any transactions it cannot be deleted.
Transactions can be either Sales, Purchase, or Adding opening stock.
The best way to avoid such products is by deactivation them
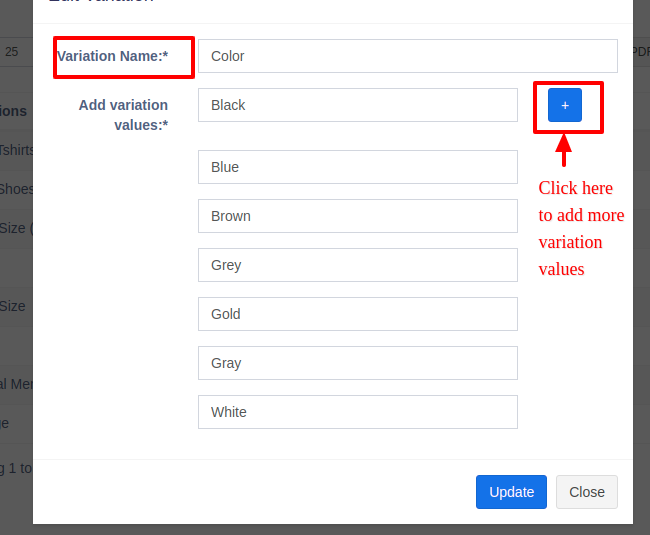
- Variations can be added from Products -> Variations menu.
- These variations are used in variable products product.
Example of variation is for example, a Jeans can have multiple colors, so add variation called Colors and provide the value for it. As given in the image below.
Different Products have different units. POS allows you to add different units for products.
Adding Units
- Go to Settings -> Units
- Give the unit name, a short name, and choose if want unit to allow decimals.
Example:
Name: Meter
Shortname: Mtr.
Allow Decimal: Yes.
Allowing decimal allows you to purchase/Sell the product in decimal and vice-versa.
Multiple Units:
This can be useful if you purchase products in a different unit and sell it in a different unit.
For example: Purchase in dozens and sell in pieces.
Or purchase in boxes and sell in pieces.
Steps:
- Add the lower unit from Add Unit Screen. For example pieces.
- Add the higher unit as per the screenshot:
- Check “Add as multiple of another unit”
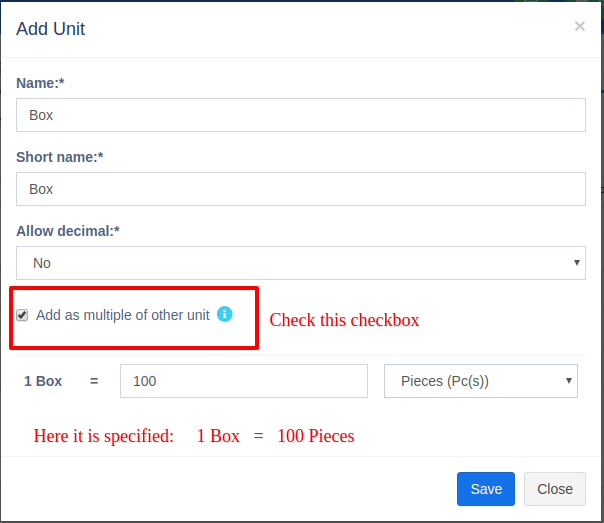
- Provide the conversion Details.
- Check “Add as multiple of another unit”
- Use the unit in Add/Edit Product. While adding/editing purchase/ sale you can see the dropdown for units. Select the desired unit and it will change the unit purchase/sales price accordingly.
NOTE: You will not see the main Units (Dozen in this example) in the Add-Product Unit dropdown, select piece as the unit of product. All purchases/sales get saved in the lower unit (pieces in the above example). So after adding purchases/sales if you edit the conversion details, it will affect the purchases/sales quantity accordingly.
Selecting relevant Sub Units for a products
For some products not all sub-units will be required. Suppose for example you sell Oranges only in Dozens or only in pieces then it will be useful.
Enable it from Business settings ->Products -> Enable relevant sub-units
Now when adding products select the Unit for the products and it will give option to select multiple applicable sub-units. Selecting the sub-units will allow you to do purchases or sales on this selected sub-units.
Categorizing products helps you to easily manage and filter them in reports.
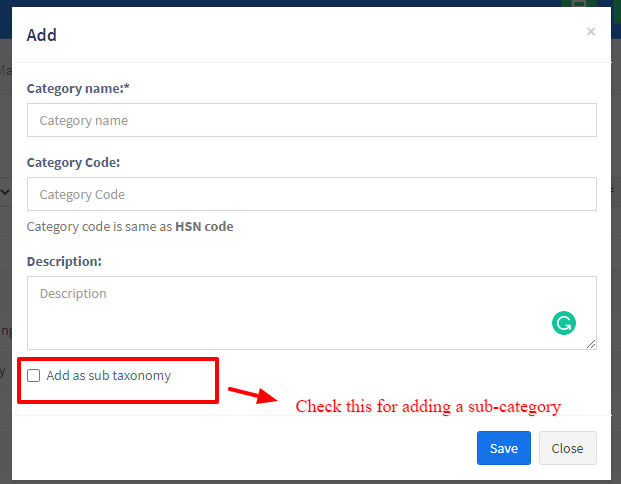
Adding Category & Sub-Category
- Go to Product -> Categories -> Add
- Add Category name, category code(HSN code)
- If the category is sub-category select “Add as sub taxonomy” and select the parent category.
POS comes with an inbuilt feature to print customised labels for products.
You can go to print label screen from multiple places:
- From Products Sidebar menu Products -> Print Labels.
- Go to Products -> View Products and click on Actions -> Labels. This will add the selected product to print label list.
- Go to Purchases -> List Purchases and click on Actions -> Labels. This will add the products from the selected purchase to print label list.
Printing Labels
- Once you’re in print label screen, add the products for which you want to print labels by entering the name or barcode/sku id.
- Adjust the quantity of each product’s label (No. of labels).
- Select the information you want to display in labels by checking/unchecking the options under “Information to show in labels” heading.
- Select the Barcode Setting according to your sticker. We have included some commonly used settings.
You can add new setting from Settings -> Barcode Settings menu. - Click on Preview to view the labels.
- If everything looks good you can click on Print button to print it.
Note: You must set the Margins to ‘default’ in browser print window. - If some information is getting half displayed because of sticker size, then it is advised to hide them or better to use a 20 Labels Per sheet settings.
Error: Unsupported SKU id for the selected barcode type
This error means the SKU provided by you when creating the product doesn’t satisfy the encoding as per barcode type.
The solution can be edit the product and change the barcode type as “Code 128” save & try printing the label again.
Adding Purchase
- Go to – Purchases -> Add Purchases
- Type Supplier Name or Business name in the Supplier field. If the supplier doesn’t exist you must add them from Contacts -> Suppliers -> Add
- Enter Purchase reference number, Purchase date & Order Status.
- Select Business Location: Select a location where you want to add the purchase. You can add a new Location from Settings -> Business Locations.
- Type product name or scan the product barcode number. It will show related matched products, select a product to add it to the purchase list.
- On adding a new product you can enter purchase quantity, purchase price, and tax information.
- To add a discount: Select the discount type (fixed or percentage) and enter the amount. ultimatePOS will auto-calculate the amount after discount.
- Enter purchase tax, Shipping Details, Additional Shipping charges, Payment status, & Additional notes.
You can view the list of purchases from Purchases -> List Purchases.
You can Print Labels for your purchase by Clicking “Print Labels” in List Purchases screen.
No matching product found
This error will be displayed in 3 conditions:
- Reason 1: There are no products matching the name or SKU which you have entered. Check it once in the list products.
- Reason 2: Check the business location selected in add purchase have that product. So if the business location is Location-1, then in add/edit product the product must be assigned to that location. Check More here in Add/Edit Products
- Reason 3: Make sure the product has Stock-Management ENABLED in Add/edit product. If stock management is not enabled in products then it won’t show in the add/edit purchase.
What is a Sales Order?
Sales Order is a document given by the supplier to the buyer against a Purchase Order by the buyer.
A sales order contains the buyer invoicing details, delivery details, products, quantities, pricing, tax, discounts, payment terms, payment details, shipping charges if any, and other notes.
Once the buyer agrees on the sales order, goods are shipped by the supplier.
Sale order has multiple statuses: Ordered, Partial, Completed
Enabling Sales Order
To enable Sales Order, follow the below steps:
- Go to Settings -> Business Settings
- Sales tab -> Enable Sales Order
- Save it.
Using Sales Order in POS
Creating sales order
After Enabling sales order, inside Sales you’ll find the Sales-Order menu.
Go to add sales order, fill in all the details and save it.
Stocks are not deducted for sales orders.
Once a sales order is created you can print it and send it to the buyer for approval.
Converting Sales Order to Sales
On approval of sales orders, you can create sales from the sales order.
- Go to Sales -> Add sales, select the business location & Customer.
- On Selecting it will populate the list of all sales orders related to the customer on the “Sales Order” dropdown.
- Select the Sales Order and it will auto load the products for that order with the product’s price, tax, discounts applied automatically as the sales order.
- You can increase or decrease the quantity.
Interactions points in POS Screen.
Selling Products, Changing Product Price, Tax & Discount, Lot number & Expiry
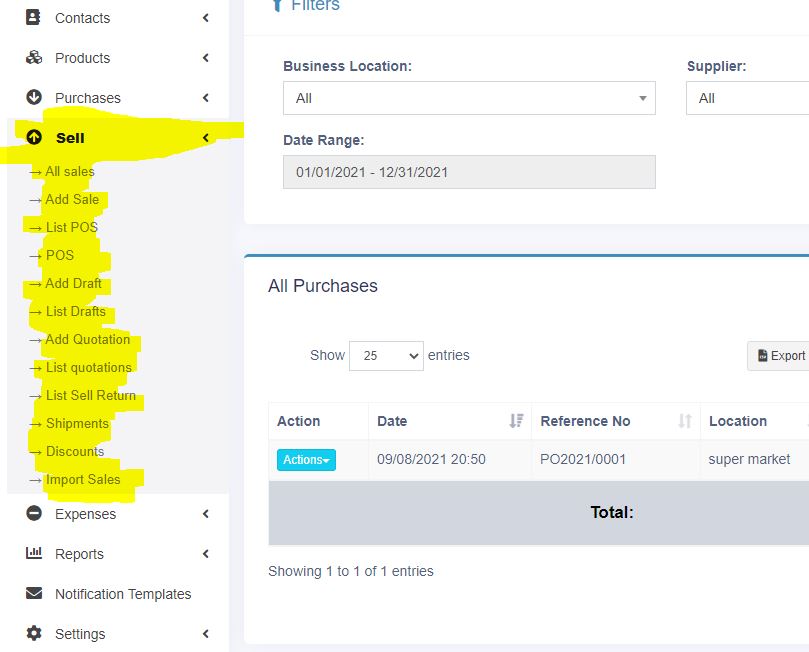
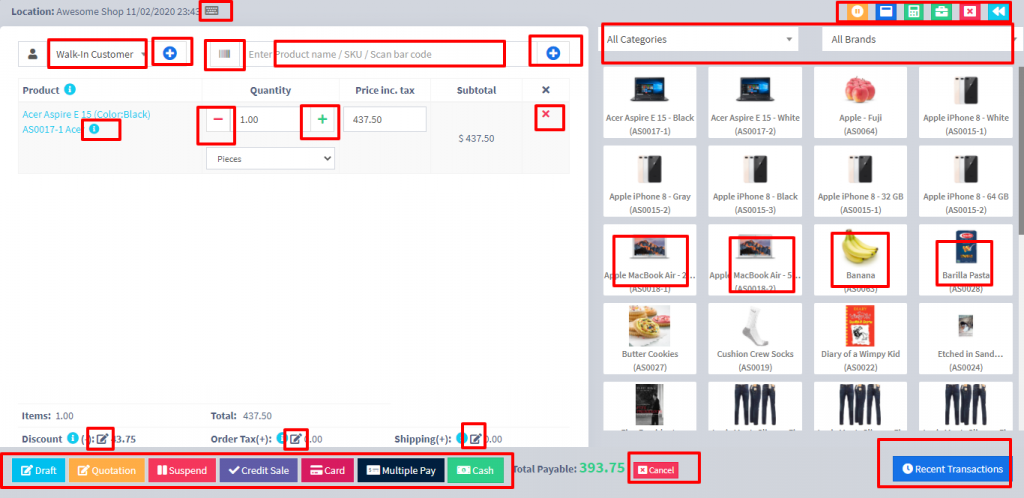
Go to – Sell -> POS
Selecting Customer:
By default, there is “Walk-In Customer”. You can search for a customer by name/customer id or phone number or can add new customer by clicking the plus (+) button “Add Customer”.
Searching & Adding Product:
Enter Product Name Or scan the barcode to search the product. If multiple products are matched then it displays the dropdown of products, selects the product from it. Or if there is a single product then it directly gets added to cart.
Changing Product Price, Tax & Discount for a product
- After the products get added, click on the product name to modify product price, tax & discounts.
NOTE: Option for different tax in products will be shown only if 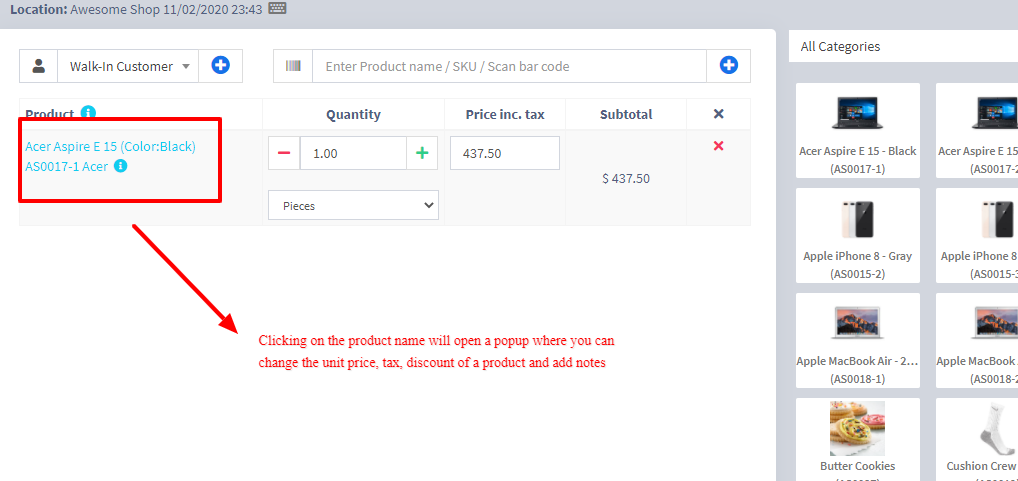 Inline tax is enabled. You can enable it from Business Settings -> Tax -> Enable Inline Tax in purchase and sell
Selecting Lot number for a product
- If lot number is enabled then it will show the option to select lot number. (Enabling Lot number)
Selecting Expiry for a product
- Expiry Date: If the expiry date is enabled then it will show the option to select lot number. (Enabling expiry)
Cancel Sales:
To cancel the sales click on the cancel button. Cancel invoices are not saved in the system, so no stock will de deducted.
To finalize the invoice click on Finalize – Add the payment options and save it.
On save it will display an invoice printing option.
NOTE: For invoice to print correctly – The Margins options should be set to “Default”.
List of sales can be viewed from Sell -> List Sales.
List of drafts can be viewed from Sell -> Drafts.
Both Sell & Drafts can be edited to make any changes.
Express Checkout: Express Checkout means the sale will be marked as Paid and the payment method will be cash. No separate payment screen will be displayed. Printing of invoice depends on the business location settings.
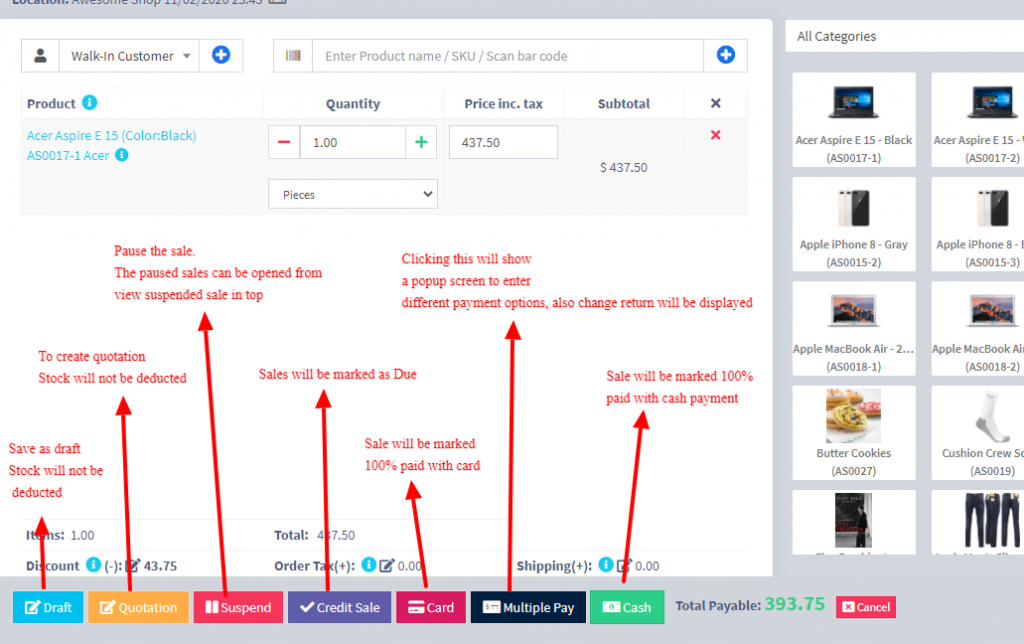
100% Credit Sales
- To sell on credit to the customer you first need to enable this button by going to Settings -> Business Settings -> POS ->
- Then on the POS screen, you will be able to see a button “Credit Sale”, simply click this button to make sales on credit.
Half Credit & half payment Sales:
Suppose invoice amount is $1000, customers pays $700 cash and $300 is credit amount on him, then follow these steps:
- Click on multiple pay button
- Select the payment method and enter the amount paid by the customer. ($700 in our example)
- Click finalize payment.
- Now, the pending amount is automatically added as credit amount on him (or amount to be taken from the customer)
Draft & Quotation
This is useful if you want to create a quotation before sales.
Marking a sales as Draft or Quotations will not deduct the available stock.
You can view all Quotations & Drafts from List Quotation or List Draft respectively. Existing draft/Quotation can be edited to make it as final sales.
Suspended Sales
Suspend Sales means unfinished sale or hold Sale.
Suspended sales stock gets deducted from available stock. You can view all suspended sales by clicking on the Yellow Color button present in very top right of screen (above the date).
Some Use Case of Suspended sales
- In a grocery store, if you have suspended button, you can suspend particular customers sales and entertain another customer, when his comeback you can proceed with his sale.
- In Restaurant, you can suspend the order of customers if not yet paid, and finish it when they finish eating and paid their order, so you can proceed to final sales. You can put Table 1, Table 2, Table 3… so when they finish it’s easy to identify table 3 going to pay.
- In hotel lots of customers check in stay for 2 nights and order some foods and customers say, just charge to room 024. So you can suspend their orders and edit if there is some additional order and suspend again. Until final it when they pay their bills. on Hotel, on Reference Number: Room 009, Room 012
Card / Multiple Pay / Cash
- Multiple Pay: Used when the customer wants to pay with different payment methods like some amount by card, some by cash and some other payment methods. This option is also used when the customer doesn’t pay the exact tender amount and you need to calculate the Return Change.
- Card: Used when the customer wants to pay the complete invoice by card.
- Cash: Used when customer pay the exact amount of invoice by cash. If the customer pays less or more amount then the invoice amount then use Multiple Pay to get change return.
Adding payments from Contact
Go to contact -> Suppliers. Click on actions for the supplier and it will show “Pay Due amount”, click on it and pay the amount. “Pay Due amount” this option is not displayed if there is no payment due.
Adding/Editing Payment Method or Pay-Via
Follow Add/Edit Pay-Via / payment method.
Rounding Mechanism for total Sales amount or total payable
Rounding helps to round the total payable to nearest currency exchange available.
To enable rounding go to Settings -> Business Settings -> Sales and choose the Amount rounding method
Amount rounding method
- Round to nearest whole number: It will round the paybale value to nearest whole number. For example 1.49 will be rounded to 1.00, and 1.51will be rounded to 2.00
- Round to nearest decimal (multiple of 0.05): It will round the paybale value to nearest decimal number which is multiple of 0.05. For example 1.49 will be rounded to 1.50, 1.51 will be rounded to 1.50, 1.59 will be rounded to 1.60, 1.54 will be rounded to 1.55
Similary all other round to nearest decimal number works as per the multiplier.